Placeholders template tag
Contents
The placeholder template tag is what make Gerbi CMS flexible. The workflow is that you design your template first according to the page design. Then you put placeholder tag where you want dynamic content to be. For each placeholder added you will get a corresponding field in the administration interface so you can insert dynamic content. You can make as many templates as you want, and even use the template inheritance.
The syntax for a placeholder tag is the following:
{% placeholder "<name>" [on <page>] [with <widget>] [parsed] [inherited] [as <varname>] %}
Detailed explanations on placeholder options
the on option
The on is provided to indicate the name of the page from which this placeholder should to get its content.
If the on option is omitted the CMS will automatically use the current page (by using the current_page context variable) to get the content of the placeholder.
Template syntax example
{% placeholder "main menu" on root_page %}
the with option
The with option is used to change a placeholder widget within the administration interface.
By default the CMS will use a simple TextInput widget. By using the with option you can change the widget to use. Widgets need to be registered before you can use them in the CMS:
from pages.widgets_registry import register_widget
from django.forms import TextInput

class NewWidget(TextInput):
    pass

register_widget(NewWidget)
Template syntax example:
{% placeholder "body" with NewWidget %}
Note
This CMS is shipped with a list of useful widgets .
The as option
If you use the option as the content of the placeholder content will not be displayed: a variable of your choice will be defined within the template’s context.
Template syntax example:
{% placeholder "image" as image_src %}
<img src="{{ img_src }}" alt=""/>
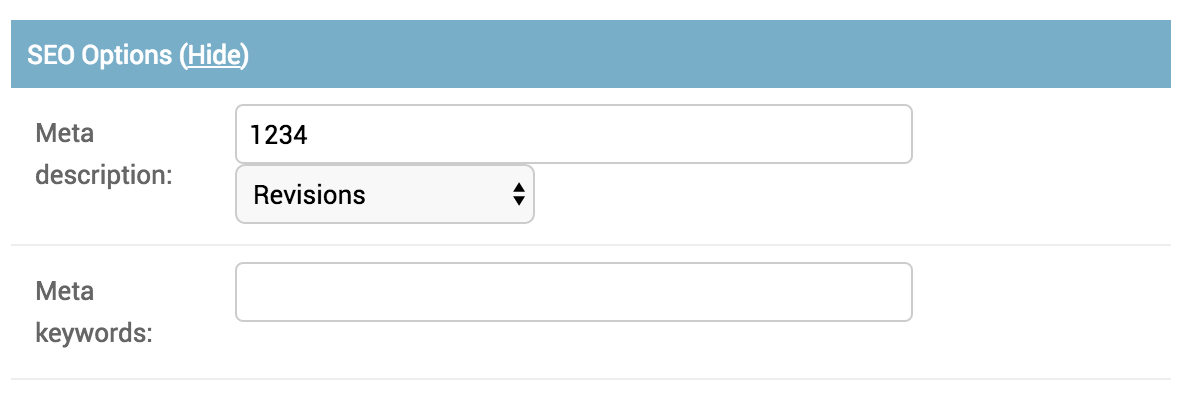
The section option
The section option is used to group placeholders into a section in the admin interface. A section is collapsed by default and hides the fields.
Template syntax example:
<meta name="description" content="{% placeholder "meta_description" section "SEO" %}" />
<meta name="description" content="{% placeholder "meta_keywords" section "SEO" %}" />
You will get
The parsed keyword
If you add the keyword parsed the content of the placeholder will be evaluated as a Django template within the current context. Each placeholder with the parsed keyword will also have a note in the admin interface noting its ability to be evaluated as template.
Template syntax example:
{% placeholder "special content" parsed %}
The inherited keyword
If you add the keyword inherited the placeholder’s content displayed on the frontend will be retrieved from the closest parent. But only if there is no content for the current page.
Template syntax example:
{% placeholder "right column" inherited %}
The untranslated keyword
If you add the keyword untranslated the placeholder’s content will be the same whatever language you use. It’s especialy useful for an image placeholder that should remain the same in every language.
Template syntax example:
{% imageplaceholder "logo" untranslated %}
The block keyword
Placeholders can also be rendered as template blocks. The content of the placeholder is then available as the content variable:
{% placeholder "title" with TextIntput block %}
    {% if content %}
        <h1>Welcome: {{ content }}</h1>
    {% endif %}
{% endplaceholder %}
Examples of other valid syntaxes
You can off course combine any of those syntaxes to your convenience. This is an example list of different possible syntaxes for this template tag:
{% placeholder "title" with TextIntput %}
{% placeholder "logo" untranslated on root_page %}
{% placeholder "right column" inherited as right_column parsed %}

...
<div class="my_funky_column">{{ right_column|safe }}</div>
Image placeholder
There is a special placeholder for images:
{% imageplaceholder "body image" block %}
    {% if content %}
        <img src="{{ MEDIA_URL }}{{ content }}" alt=""/>
    {% endif %}
{% endplaceholder %}
A file upload field will appears into the page admin interface.
File placeholder
There is also a more general placeholder for files:
{% fileplaceholder uploaded_file as filesrc block %}
    {% if content %}
        <a href="{{ MEDIA_URL }}{{ content }}">Download file</a>
    {% endif %}
{% endplaceholder %}
A file upload field will appears into the page admin interface.
Markdown placeholder
If you want to write in the MarkDown format there is a MarkDown placeholder:
{% markdownplaceholder mark %}
Note
You will have to install the Markdown library
$ pip install Markdown
Contact placeholder
If you want to include a simple contact form in your page, there is a contact placeholder:
{% contactplaceholder "contact" %}
This placeholder use settings.ADMINS for recipients email. The template used to render the contact form is pages/contact.html.
Create your own placeholder
If you want to create your own new type of placeholder,
you can simply subclass the PlaceholderNode:
from pages.placeholders import PlaceholderNode
from pages.placeholders import parse_placeholder
register = template.Library()

class ContactFormPlaceholderNode(PlaceholderNode):

    def __init__(self, name, *args, **kwargs):
        ...

    def get_widget(self, page, language, fallback=Textarea):
        """Redefine this to change the widget of the field."""
        ...

    def get_field(self, page, language, initial=None):
        """Redefine this to change the field displayed in the admin."""
        ...

    def save(self, page, language, data, change):
        """Redefine this to change the way to save the placeholder data."""
        ...

    def render(self, context):
        """Output the content of the node in the template."""
        ...

def do_contactplaceholder(parser, token):
    name, params = parse_placeholder(parser, token)
    return ContactFormPlaceholderNode(name, **params)
register.tag('contactplaceholder', do_contactplaceholder)
And use it in your templates as a normal placeholder:
{% contactplaceholder contact %}
Changing the widget of the common placeholder
If you want to just redefine the widget of the default PlaceholderNode
without subclassing it, you can just you create a valid Django Widget that take an extra language paramater:
from django.forms import Textarea
from django.utils.safestring import mark_safe
from pages.widgets_registry import register_widget

class CustomTextarea(Textarea):
    class Media:
        js = ['path to the widget extra javascript']
        css = {
            'all': ['path to the widget extra css']
        }

    def __init__(self, language=None, attrs=None, **kwargs):
        attrs = {'class': 'custom-textarea'}
        super(CustomTextarea, self).__init__(attrs)

    def render(self, name, value, attrs=None):
        rendered = super(CustomTextarea, self).render(name, value, attrs)
        return mark_safe("""Take a look at \
                example.widgets.CustomTextarea<br>""") \
                + rendered

register_widget(CustomTextarea)
Create a file named widgets.py (or whathever you want) somewhere in one of your project’s application. and then you can simply use the placeholder syntax:
{% placeholder custom_widget_example with CustomTextarea %}
Note
You have to make sure your widgets.py file is executed before using the widget. To be sure of this, you might import your file into the models.py of your application.
Note
More examples of custom widgets are available in pages.widgets.py.
List of placeholder widgets shipped with the CMS
Placeholder could be rendered with different widgets
TextInput
A simple line input:
{% placeholder "<name>" with TextInput %}
Textarea
A multi line input:
{% placeholder "<name>" with Textarea %}
AdminTextInput
A simple line input with Django admin CSS styling (better for larger input fields):
{% placeholder "<name>" with AdminTextInputWidget %}
AdminTextarea
A multi line input with Django admin CSS styling:
{% placeholder "<name>" with AdminTextareaWidget %}
FileBrowseInput
A file browsing widget:
{% placeholder "<name>" with FileBrowseInput %}
Note
The following django application needs to be installed: https://github.com/sehmaschine/django-filebrowser
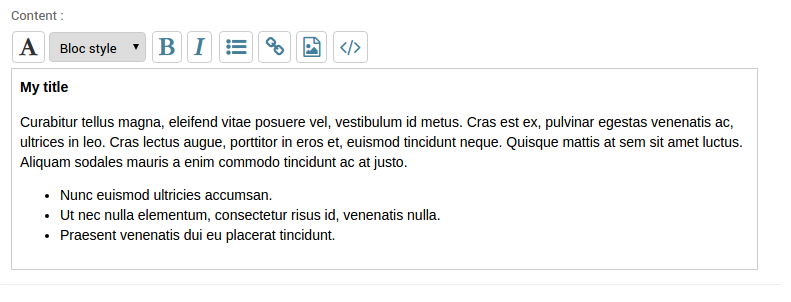
RichTextarea
A simple Rich Text Area Editor based on jQuery:
{% placeholder "<name>" with RichTextarea %}
CKEditorPlaceholderNode
A simple CKEditor custom placeholder:
{% ckeditor_placeholder "<name>" with ckeditor %}
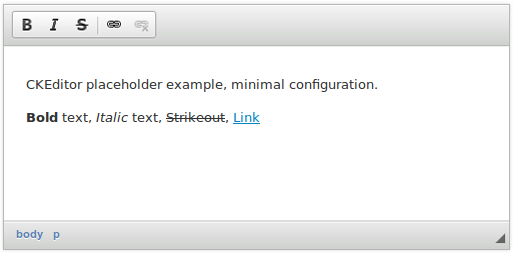
The variable CKEDITOR_CONFIGS in settings.py exists to define editor
configurations. To use a custom configured editor in templates, just specify the
configuration name as follow:
{% ckeditor_placeholder "<name>" with ckeditor:minimal %}
If no configuration is specified a default configuration will be used. The
default configuration has to be defined in CKEDITOR_CONFIGS. For example:
CKEDITOR_CONFIGS = {
    'default': {
        'width': 600,
        'height': 300,
        'toolbar': 'Full',
    }
}
Note
In order to use this placeholder, the application django-ckeditor needs to be installed and configured (trivial). See the docs for further details. Also have a look at the example project to see a working implementation.